 I finally got the courage to stencil the flowers on Gabby's wall and I surprised myself (and Noah) with how well they turned out. I bought a stencil cutter at a local craft store for about $18 (regularly priced at $30, however this particular craft store takes 40% off of one item). Apparently, "stencil cutter" is just a glorified name for soddering iron; however, after attempting to use Noah's $4 soddering iron, I decided against it (the tip wasn't sharp enough and the handle was too far up to have the control you need to cut stencils. So go ahead and fork out the $18.
Here's how I did it:
- I drew pictures of vines, leaves (in about 5 sizes), and the outline of 2 flowers in different sizes
- I traced them PATIENTLY with my stencil cutter
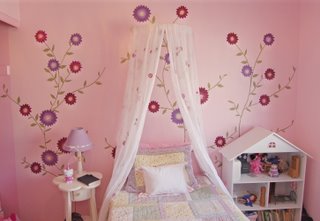
- I then taped up the finished stencils on the wall in position and sponged a small amount of paint over the stencil (if you use too much paint it will bleed through)--I stenciled the vines first, followed by the leaves, ending with the flowers
- With the flowers, I alternated between two basic flower colors, one being more purple while the other was more pink (notice picture), using 3 different colors of paint on each type (just the cheap acrylic paint you can get at any craft store) I put the darkest color on the outside, a lighter color on the inside, with a dab of yellow in the center. The leaves and vines were all done in the same green tone.
Was it Worth it?
Yes! It took hours to finish (probably 10 hours total if you include figuring out and making the stencils) but I'm so happy with it--I love doing projects that stay done, unlike laundry, cooking, cleaning and changing diapers.
What I Wish I had Known Before I Tackled this Project:
I wish I had known not to put too much on one stencil (the plastic becomes flimsy and is difficult to work with). I also wish I had known how to divide the space on Gabby's wall more evenly (it's nicely hidden behind her bed and accessories now), but the flower vines aren't as well distributed as I'd like, still, for a first time I'd say it isn't half bad!
What's left:
I still need to order the fairy wallies to place around the flowers, and I'd like to get some nice silk drapes for Gabby's window.
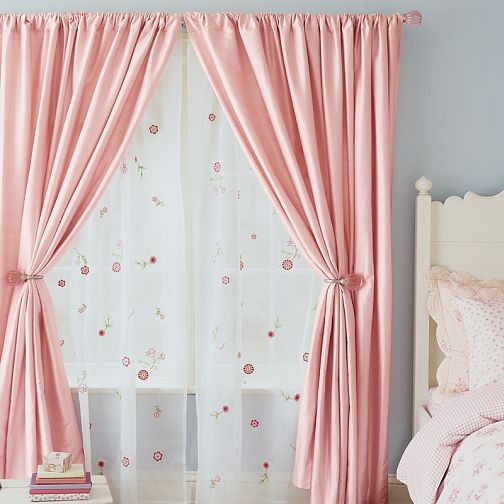 These curtains are from Pottery Barn of course and I think they'd work perfect in Gabby's room. I've looked everywhere I can think of to find similar curtains at a better price, but no one seems to carry pink dupioni silk drapes. I've even looked at buying the fabric and making the curtains myself but at $13 a yard for the right material, even Pottery Barn's price sounds nice. I'll probably just splurge after our house sells (December 18th but I'm still not holding my breath). Hopefully luck will shine on me and Downeast Home will get in a large shipment of these curtains in the length I need so I can get them at $35 a panel instead of $89.


2 comments:
Those look great! You have given me the courage to make my own elephant stencils for little Henry's room!
I'm so glad! You'll have to let us know how it went--Post pictures on your blog 'n stuff.
Post a Comment